How to draw car - How To Discuss

David Jones
Published May 23, 2026
| back tires and edges circles or ovals |
| The Sketchbooks application |
How to draw a car bit by bit guidance! Make the most of this valuable chance to customize your drawing a vehicle make a paper model of your optimal vehicle.
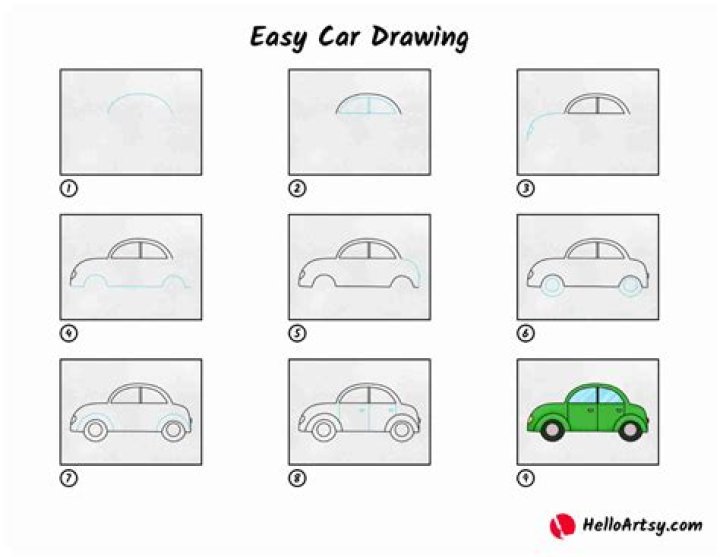
Bit by bit Instruction on How to Draw a Car: Method 1
Vehicles have generally been one of the kids’ most loved toys. It has for quite some time been the subject of many animations motion pictures and series, among the most outstanding Cars, Speed Racer, and hot wheels.
This will without a doubt be an agreeable action for youngsters who love vehicles.
In the event that you have a youngster who is keen on vehicles, drawing a vehicle is the ideal task to keep your children cheerful and imaginative simultaneously.
Stage 1:
Draw two little circles at the lower part of your paper. This will be the internal casing of your vehicle’s wheels.
Assuming you can let loose the specific circle shape, relax! You may constantly utilize a compass, a drawing apparatus that permits you to quickly and easily draw an ideal circle.
Stage 2 - Draw Car Tires:
Draw two different circles around the little circles we attracted the past advance.
Whenever you have wrapped up drawing the round shapes, they should resemble a couple of wheels, as displayed in the image. The wheels should likewise be one inch separated.
Stage 3 - Attach Bumps to Wheels:
Draw a long, rectangular shape that associates the two wheels. The guard will fill in as the vehicle’s base so ensure you do it as long as you need your vehicle.
Stage 4 - Define the Body of the Car:
Right over the guard, adjust the vehicle body outline by defining bended boundaries down to the opposite finish of the guard.
The edge comprises of two bended vertical lines: one little bended line of hood associated with a broad bended line to shape the top of the vehicle.
Stage 5 - Draw the Front Door:
Define a bending boundary on the left half of the rooftop, following the framework. Then, at that point, utilizing a straight line, interface the two closures of the bended line,90-degree point line to one side.
Stage 6 - Next, Draw a Background Window:
To make two car windows that are a similar size and structure, rehash the past cycle on the opposite side of the vehicle. The front window ought to be marginally bigger than the back window.
Stage 7 - Then, Explain the Previous Door:
Make a front entryway by drawing a square shape with bended corners under the front window. Recall that the front window and front entryway ought to be endlessly adjusted.
Stage 8 - Draw Lights and Door Handle:
It’s currently time to add subtleties to the vehicle to show up more practical.
Begin by drawing half-roundabout shapes on the two finishes of the vehicle to make front light and taillight. The headlights should be set simply over the vehicle’s guard.
Stage 9 - Add Patterns to Windows Car:
Vehicle windows will generally be more brilliant, along these lines causing apparent a corner to corner design. Draw numerous matching outline lines in every vehicle window to make a “show” deception.
Summary:
Since you have effectively planned the vehicle, it is the ideal opportunity for the most intriguing part - shading your vehicle! Continue to pick tones to make your vehicle lively and vivid!
Vehicles arrive in an assortment of plans and are accessible in all tones. Along these lines, assuming you have a most loved shading, there is presumably a vehicle with that tone.
This gives you many shading choices to browse while shading your vehicle.
Your Car Design Is Complete!
Ideally, you or your children have had loads of tomfoolery figuring out how to draw a vehicle with this bit by bit instructional exercise.
This is a phenomenal and charming method for investing your energy sharpening your imaginative abilities and making your fantasy vehicle wake up all the while!
How to Draw a Car: Method 2
Every person needs to let their feelings out. When words fail to communicate our emotions, we draw or paint. You may accomplish the same thing with your car by modifying it. By changing the look of your car, you can say whatever you want without saying a word. Drawing a car can be challenging somehow, but it is possible to learn to draw a car with a few smooth and easy styles to draw with a few simple steps. To start drawing your car, just take a piece of paper and a pencil and start as if you were drawing any other step by step. With a few primary conditions and the proper techniques, you will have the opportunity to paint your car step by step.
Drawing a car is very easy because it can be a fun activity that you love. Every artist understands how much fun it is to paint a car., a truck, or any car. Drawing this kind of car can be understandable and understandable if you know the proper techniques that help your kids enjoy drawing more.
Summary
Learn to draw a car. Whether you want to learn to draw a race car, an old car, a new car, any type of car you can drive. These instructions are too easy for anyone to follow. This article will show you step-by-step instructions on drawing a car quickly and easily.
Step 1: Begin by drawing the car’s body.
Draw a square shape for the vehicle’s essential body. To make it easier to see, use light strokes.
Step 2: Design a car cabinet.
Draw a curving line from one end of the rectangle to the other. At both ends of the rectangle, draw two-wheel circles on the bottom line. Always remember to make the lashes easier.
Step 3: Make a front bumper.
Now it is time to stop the front bumper on the right side of the rectangle.
Step 4: Draw the front and back door screens.
Draw front and rear door screens and front and rear door lights. Remove all unnecessary lines. Once the car frame is finished, it should be highlighted to look good.
Step 5: Separate the wheels.
The wheels should be separated from the car body by inserting gaps between them and removing all other wheels.
Step 6: Design doors and mirrors.
You will also need to mark the partitions of the mirrors and car doors.
Step 7: Draw rims.
Next, draw a rim (wheel) and complete the wheel’s outline.
Step 8: Add completion details.
All other details of your car should be in the front, such as the handles and the wheel of the vehicle. You’re ready to go now that you’ve drawn all of the details.
How to Draw a Car: Method 3
You will understand how to draw a car by following these simple steps. This article gives beginners a quick guide to drawing cars.
We know that people may think it is hard to learn to draw cars by following simple steps, but it is possible to do them - if you have the right direction. That’s the reason we decided to make a step-by-step guide. We’re hoping it’ll make drawing cars a little easier. And maybe more fun! It makes no difference if you’ve never painted before as long as you follow these basic steps and have faith in us.
Step 1: Draw a basic car frame.
To draw a car, start by drawing its base frame. To define body boundaries, draw light lines to mark the lid, bark, stem, and other vital parts.
Step 2: Add the most apparent features of cars.
Include the most notable features of the car, such as headlights, wheel arches, radiator grille, and window frames. You may want to check your car’s mirror image to ensure it is correct.
Step 3: Add details.
Now, add the usual extensive details. For example, draw an air inlet on the front bumper. When that is complete, draw the rear mirror and the B-pillar, and the wheels with smooth lines on the arch of the wheels.
Step 4: Draw the doors and handles.
Draw the doors and the area of the door handles on the side of the body. Next, describe the rim pattern using straight lines. Provide grille and take extra details.
Step 5: Draw a front view of the car.
Draw the front of the car using sharp, black lines. Next, draw a license plate and lines on the radiator grille and ventilator. Draw everything neatly, like for example.
Step 6: Create a topside.
Do the same procedure at the top of the car. The ceiling, windows, and rear-view mirror should be defined in bold, well-defined lines. Remove unnecessary construction lines as you draw the car parts in detail.
Step 7: Add Details.
Draw the side areas and the visible part of the car trunk in a little more detail. Do not forget to draw decorative lines on the side of the car’s body to give the handles more details.
Step 8: Draw wheels and rims.
Here, you will draw the wheels and rims, which is more complicated than drawing the previous steps. Make sure the wheels are smooth and smooth to get a smooth wheel and equal gears.
Step 9: Finishing touch.
Adding shadows will give the painting a convincing and vibrant look. To draw shadows, you have to use hatching, taking into account the shape and curves of the car parts. By doing so, the design of your car will look realistic and three-dimensional.
How Easy to Draw Sports Vehicles:
Good day, and welcome to the drawing lesson. We show you how easy it is to draw sports cars. Here we give you instructions on how to draw a sports car in one of our previous drawing lessons, but this tutorial is straightforward. We’ll demonstrate how simple it is to draw sports cars. Using a Lamborghini example, but using this tutorial, you will be able to draw any other car.
Step 1:
Therefore, using angular lines draw the main body parts of our sports car.
Step 2:
A straightforward step where we will draw the wheels.
Step 3:
In the upper part, we draw pictures of the windows of a sports car.
Step 4:
Go down a bit and draw the mirror’s lines that show the back and door.
Draw front and rear bumpers and headlights.
Step 5:
Wipe all the overlapping lines in front, draw a lamp and make the hood a little round.
Step 6:
Accurately paint roofs, windows and doors, and clear all unnecessary lines next to the car.
Step 7:
Do the same in the back of our sports car - erase unnecessary lines and make the lines very dark and fun.
Step 8:
Let’s move on to the wheels. We remove arch wheels and wheels with rim frames.
Step 9:
And the last step is when we draw the rims themselves. You can draw them as in our example or make any other design (or take a look at some of our drawing lessons in the “Cars” section).
Summary:
Therefore, this drawing lesson was dedicated to how easy it is to draw sports cars. If you liked this drawing tutorial, and it seems very easy for you, visit Ferrari or Race Car tutorials. Don’t forget to share this with our other articles and subscribe to our forums.
The most effective method to Draw a Cartoon Car:
To draw an animation vehicle made at home, some craftsmanship you can send in the ice chest, or for no reason in particular, you can definitely relax - it’s simple! Begin by leisurely drawing an essential state of a round or boxed vehicle with a pencil. Then, at that point, add subtleties like windows and guards, obscure the lines you need to keep and erase all the others. Then, think about adding some tone or even a face to your animation vehicle!
1: Draw a little square shape
Draw a little square shape marginally with a vehicle body pencil. Utilize a basic touch to clear lines and pivot corners on a case-by-case basis. This first square addresses the essential body design of your vehicle, so make it as lengthy and wide as you would like the body of the completed vehicle to be.
Regardless of whether you need to draw your vehicle with pens, markers, or paints, begin drawing a little with a pencil. It is extremely simple to commit changes or right errors thusly!
Begin your attracting this method for making a side view (2-layered perspective on) the animation vehicle.
2: Place a half circle
Place a half circle on the square shape to show the rooftop and wind windows. The measurement (width) of a roundabout circle should be 66% to 3/4 of the length of the square shape. Embed a half-circle over the square shape, or slide back a little so the vehicle’s hood is longer than the storage compartment.
As this is an animation vehicle, precision isn’t fundamental here. Be that as it may, assuming you are searching for a more exact half-circle, utilize a drawing compass or protractor, under glass, or another method for drawing circles.
3:Draw 2 circles
Draw 2 circles under the square shape of the vehicle wheels. The two circles ought to be associated by the even line at the lower part of the square shape. Place each circle at the lower part of the region where the half-wheel drive can meet the square shape of the vehicle body.
Contingent upon how genuine you need your animation vehicle to be, you can make the wheels as large or as little as you can imagine. By and large, the width of each wheel should be one-6th the length of the square shape addressing the body of the vehicle.
4: Edges
Cut the edges of the vehicle body and clear the overabundance defining boundaries. Utilize your eraser to eliminate the running lines between each wheel. Then, at that point, utilize your pencil to circle the sides of the square shape. You can pivot the corners equally or make the hood of the vehicle more bended than the back.
Whenever you have made your preferred round corners, clear the sharp corners of the primary square shape.
5:Wheels
Draw knocks on the front and back of the wheels. Make every guard look square or rectangular with round corners. Place the front guard before the front wheel in an adjusted rectangular corner. Place the back guard behind the back tire similarly.
Utilize your elastic on a case-by-case basis to eliminate any lines inside the knocks.
6. Front Light
Add a round front light and a square tail of light. Position the front light circle simply over the front guard. Essentially, add a square with adjusted edges over the back guard to address tail light.
7: Headlamp
Make a face with a headlamp and a guard assuming that you need. Rather than a standard-sized light, make the headlights more splendid to give your vehicle a facelift! Draw a little circle inside it for the eyeball, the flat line inside the eyelid, and the level line over the eyebrow.
You can rapidly transform the front guard into the mouth. Rather than a rectangular square shape, give the knock a bend upwards to make it resemble a side perspective on a grin. Then, at that point, clean a few lips and teeth assuming you like!
8. Window
Draw a window on the vehicle covering by making a half-circle. This final part circle ought to be right inside and marginally more modest than the half circle that makes the vehicle shelter. The little hole between the halfway circle addresses the window casing and top of the vehicle.
To construct different sides rather than only one window, define two straight boundaries dispersed independently to separate the internal circle into two pieces. These lines address the door jamb between the windows.
9: More Subtleties
Add more subtleties to the vehicle in light of inclinations. You can stop here and have an essential however visual animation vehicle. Be that as it may, you might need to add different subtleties like the accompanying:
Bends inside the wheels of hubcaps.
Half circles simply over the wheels address the wellsprings of the wheels.
2 rectangular entryways predominantly, with little round square shapes for entryway handles.
A blend of rectangular and roundabout square shapes addresses the controlling haggle seats.
10: Clean your Drawing
Clean your drawing and shading it, on the off chance that you like. Revisit your drawing and delete any leftover pencil lines that should never again exist. Then, at that point, utilize a pen or marker to obscure the edge and inside lines of the vehicle. Now, you can leave the image for what it’s worth or starts painting the pieces of the vehicle with pastels, markers, or paint.
The completion subtleties are in you - make the completed animation look some way you like!
Frequently Asked Questions:
Here we discuss some FAQ’S.
Q1: How would you draw a vehicle bit by bit for youngsters?
A: Stage 1: Draw a Horizontal Line and Two Circles Over It.
Stage 2: Draw Smaller Circles Inside the Wheels.
Stage 3: Draw the Third Set of Circles Inside the Wheels.
Stage 4: Draw Lines from the Innermost Circle till the Second Circle.
Stage 5: Connect the Wheels with Two Horizontal Lines.
Q2: How would you help a 4-year-old to draw?
A: Urge kids to draw with their eyes on the article they are drawing. Take a stab at putting a square of paper on their pencil, over the spot they grasp, so they can’t see the line they make. Have them draw practice lines first. Have them work on drawing each piece of the shape independently.
Q3: What is the meaning of attracting craftsmanship?
A: Attracting is a technique in which pictures are displayed on a texture by creating lines; yet, drawings can likewise include transparent areas, washes, and other non-direct symbols.
Q4: Is sketching vehicles hard?
A: Since it is hard. Drawing a vehicle is totally different from some other item conceptualization. I think this is on the grounds that we have compelling enthusiastic relationship with vehicles. To such an extent that our psyches have developed them an arrangement of images and it very well may be difficult to move beyond those to draw what really feels like a vehicle.
Q5: Is drawing vehicle really great for youngsters?
A: On the off chance that you have a child who is energetic about vehicles, drawing a vehicle is certainly the ideal movement to keep your children engaged and innovative simultaneously.
Q6: Why drawing is a good time for youngsters?
It allows their creative mind to go nuts!
A: Drawing empowers your kid’s creative mind to turn out to be more dynamic. Per time they draw, they access their innovative idea and create authentic portraits of what’s to them. Individuals’ minds have permits them to make everything that we use and are encircle by ordinary.
Q7: Is drawing great for your cerebrum?
A: We think carefully when we draw, and this discharges endorphins, yet helps assemble new associations and pathways. While drawing, we effectively utilize the two sides of our mind, the ideal for inventiveness, and the left for consistent reasoning. This fortifies both and fosters the capacity to concentration and think in a calculated manner.
Q8: Which drawing is best for amateurs?
A: Still life drawings are ideally suited for amateurs since objects don’t move like the human figure. This is the motivation behind Drawing for the Absolute and Utter Beginner. It plans to assist anybody with figuring out how to draw from existence with precision.
Q9: Would I be able to draw on my mobile phone?
A: Sketchbook - Draw and Paint.
The Sketchbooks application is accessible free of charge download just on Android and makes it simple to plan on the telephone. The application permits you to utilize a few sorts of brushes, for example, those that seem as though pencils, pastels, and even paint sprayers.
Q10: What shape is utilized to draw a wheel of a vehicle?
A: For the back tires and edges, circles or ovals are the best shapes to draw. As recently exhorted, work on drawing these assuming you want to do as such.
Conclusion:
In this article we assemble some step by step on how to draw a car. Make the most of this valuable chance to customize your vehicle and make a paper model of your optimal vehicle.
READ ALSO: